To Amuse and Delight

Showing posts with label tips. Show all posts

Monday, January 25, 2016

blizzards, bobbles and beans

I’m sure you all saw how NYC got slammed with snow and wind this past Saturday. It was convenient to be snowed in on a weekend. We were ready for it. I planned to knit, bake and enjoy the beauty of the snow. Which I did. I made another bumpy hat. This one is less slouchy and more bumpy. My daughter modeled for me, much better than those weird angled selfies!

Bean Cake. I found a garbanzo bean cake recipe in an old Mexican cookbook. Folks today are baking with beans for GF and other health reasons, I was surprised to see it as an old  fashioned, traditional cake. 

The basic recipe:
 2  10oz. or 1 19 oz. can garbanzos 
4 eggs
1 cup sugar
1 tsp. baking powder

Bake at 350 degrees in a loaf pan for about 50 minutes

I have been tweaking and messing around with this. It is very adaptable to all kinds of flavors. You can add a grated apple, banana, vanilla, lemon, coconut, ginger, espresso powder, cocoa, cinnamon...you get the idea!

I also made a chocolate one with black beans instead of garbanzos, it was really good and less “beany”. The garbanzos do have a distinct flavor that some people won’t like. I have tried white beans and they are milder. If you are trying to hide the fact that you are eating beans go with the white or black beans over the chick peas.

Monday, November 16, 2015

Eating Acorns

The day I found those Giant Puffballs we were actually out collecting acorns. My husband was interested in learning how to make them palatable since we have so many in this area. He is into trees the way I am into healing plants. 
The White Oak is the one to collect, they are naturally less bitter.

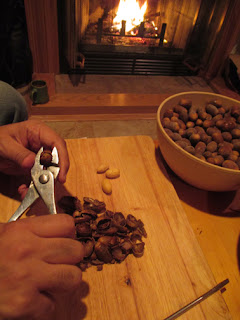
First we froze them, that made the skins come off easier. The skin is the layer just under the shell. My husband shelled them.

Next began the process of  making acorn flour. There are different ways to do that. First the bitter tannins must be removed. Some people boil the acorns multiple times until the water runs clear. We went with a non cooked method of leaching out those tannins. 
First we ground them up in the wet Vitamix. More water was added to them in a jar and this sat for 24 hours. Each 24 hours fresh water replaced the old until the water was clear.

Once the tannins were cleared out, we dehydrated the wet acorn meal. I have an Excaliber 4 tray. It came out really nice, nutty and tasty. (I snacked on some.) The grain was quite rough still, so we ground it to flour consistency in the dry Vitamix. It is came out very smooth, with a feel and look of cocoa powder.

My first test was on some cookies. Some GF friends were dropping by for tea. I grabbed everything that I had that was GF and went to work experimenting. 
I kept it simple, much like a shortbread: butter, sugar, vanilla, with cashew meal, acorn and oat flours. They were so good! Even the smallest of humans wanted more, which is really how I judge a "healthy" cookie.

Next was a recipe from the book Acorn Pancakes, Dandelion Salad, and 38 Other Wild Recipes. A simple classic, pancakes with butter and maple syrup. The acorn is so mild and nutty. It doesn't have that extra bitter taste that many of the darker grains have.

Yesterday's yummy breakfast. I had some leftover pancake batter. I waffled it and topped it with butter and smoked salmon. Again, it came out really good. 
Acorn flour is a winner!I love the idea of eating wild foods that man has not tampered with. Everything that fed that tree is now feeding me and my family. It is nutritionally excellent and it is extremely tasty and versatile. Oh, and the acorns were free!

Wednesday, October 21, 2015

Foraging the Giant Puffball

It's a good time for foraging here in NY. We have been getting lots of goodies. Just last week we scored a haul of Chicken of the Woods and Puffball mushrooms as well as white oak acorns and plantain (not the banana!). I needed to get more plantain before the frost to make my healing salves. My husband was after those acorns, he is going to make acorn flour out of them. If I don't eat them all first as a snack!

This is a lovely white Puffball Mushroom. I set those two brown ones in the background to show you what not to eat. A Puffball is good when it's all white, feels firm and a bit spongy. When they are brown they are past eating and have moved on to their spore making phase. They are quite large and easy to spot. I grabbed two this size, but left a larger one for the next human or animal forager.

You can see how easy the dirty outside peels right off. You should not eat this mushroom raw. In fact it's best to not eat any raw mushrooms.

I treated the first Puff like tofu, sauteed and seasoned with cajun spices. That's my default way of cooking and it's always tasty. But since I had so much of this mushroom I decided to experiment.

 This idea came to me while I was slicing it up. The slices really held their shape, which made me think of eggplant. Puffball parmigiana was born! 

Here you can see what the inside looks like, the texture was very good this way. There is no poison lookalike for this mushroom, so feel free to forage up some yourselves.


Thursday, May 21, 2015

slip covered hair clip : a tutorial

If you have girls or are a girl, you know about those painful-rip out your hair metal hair clips. I don't know how many brands I have tried. The packaging always promises that they won't hurt. But they do. 
Having acquired quite a collection of these hair rippers, I had enough. I refuse to buy anymore. Instead I came up with this idea...little slipcovers. Covering anything in cute fabric is great and the fabric also alleviates the hair ripping. 

It works for all sizes and shapes. 

This is how you do it...
Grab those old biting clips.

Trace clip onto the wrong side of your fabric. Make sure that the fabric is folded so you have a front and back to sew together. I happen to be recycling a carrot print boxer short.

Sew it up first, then cut it out close to your stitches. Leave the wide part open at the top (where I have the little mushroom acorn). Make sure you secure the beginning and end of those stitches so they don't open up.

 The trickiest part is probably pulling this thing inside out. Especially if it is real tiny. But, you can do it! I use an assortment of tools (and my teeth), whatever it takes to get the job done. Cut yourself a little slit on the backside. Right where my scissors tip is pointing. If you don't make that slit, it won't work.

Slipcover pulled onto your clip, you can glue it into place or tack it down with a few hand stitches. I ended up gluing this one because I didn't leave enough on the end to sew. Let that be a lesson to you! Leave more fabric on the end, sewing it makes a nicer finished clip. 

And there it is, carrot clip. No longer a menace to our tender heads.
Let me know if you give this a try.

Wednesday, May 13, 2015

steam once, eat much

I've been doing this a lot lately. Early on in the day, usually after breakfast I will steam my veggies. Carrots, zucchini  snow peas, broccoli, asparagus, whatever I have all layered up. The more delicate ones on the top. I steam them just as they turn bright green. I uncover them to stop the cooking and they are ready to use in many dishes throughout the day. 
They can be tossed into a salad. (Don't you love these paper animals? My girls print and build them from this site for free!
Or made into a quick soup. A bit of my kimchi to finish it off.
Steamed broccoli teamed up with rice and other veggies becomes filling for an omelet.  I've mentioned this before, having ingredients ready makes cooking easier and brings vegetables to "fast food" convenience. 

Friday, January 30, 2015

Fermenting Frenzy

I have been devoting much of my time to fermenting these days. Most of the time actually went into researching how to do it. The real fermenting takes place all by itself.  The good bacteria work their magic to transform simple (and cheap!) foods into healthy probiotic, super tasty treats that cost quite a pretty penny in the health food stores. 

 I devour Sandor Katz books and watch The Healthy Home Economist videos. I found their instructions very easy to grasp and execute. Especially Sandor. He leaves a lot up to your own taste and imagination. He encourages experimentation. There is no one perfect no fail recipe. There are many factors, the heat and climate of your house, the food itself, what you prefer the finish to taste like. My first fermentation experience was with sourdough starter. My starter has been going strong for about six months now. 

I made this starter with equal parts flour and water. I have seen recipes that use commercial yeast, but I didn't find it necessary. Left alone for a couple of days it caught the wild yeast it needed right out of the air. This stuff is free for the taking! It is very cold in my house right now so I don't have to feed it as much as I did a couple of months ago. Only about twice a week. I always feed it right before using it. Make sure those microbes are happy and alive, doing their thing. I should mention that even though I have a triple filter on my tap I boil the water that I will use for any fermenting to get rid of the chlorine. Chlorine kills bacteria so I don't want it to interfere or slow down the progress of the beneficial bacteria I am trying to cultivate. After using my sourdough starter I always add more flour and water to replace what I took. I keep my starter at a consistency of pancake batter.  I find it easier to feed and use this way, especially since I use it for pancakes and crepes.

My next fermented project was Kimchi. I have been eating kimchi regularly for over 20 years. My family loves it too. Unfortunately most commercial kimchis have sorbitol or msg in them. Sorbitol is a preservative, if kimchi is fermented it IS preserved. So, why sorbitol?
 I started buying only health food store kimchi. (as opposed to Korean market) That proved to be quite expensive as my family can go through a jar a week.

 I tried my  first batches with whey. Disaster every time. I don't know what I did wrong, but they were bad. Then I discovered Sandor Katz. "Why use whey?" he said, when you can make a delicious kimchi (or kraut) without it. I tried his method and it worked first time! One head of cabbage makes 2 quarts, now that is economical. I also made saurkraut and it also came out great. So addictive in fact that my daughter wanted more when it was gone so she just made her own 2 quart batch. She is tearing through it and needs to start an new batch soon. 
There are many sources detailing the process, but it is as simple as cutting, salting and washing cabbage, pushing into a jar and waiting for those happy microbes to come and transform your cabbage into something fantastic. I know I am oversimplifying, but this is basically what it's all about. The recipes always say you need to put a weight on top of your cabbage to make sure it is always submerged under 1" of water to prevent decay.  I don't have a suitable weight so I have been doing something else and it has been working out fine. I cut 2 rounds of waxed paper to fit on top of the cabbage. I pour salted water on top of that, it makes a good seal and I haven't have any spoil yet.

I moved on to a fermented soda beverage made with whey. I made 2 quarts of fresh lemonade and added 1/4 cup whey and left it alone to ferment. After 2 days I put it into one of those flip top beer bottles with the rubber gasket. As the bacteria eat up the sugar they produce carbon dioxide and this type of bottle creates a fizzy fun drink that we love.  
The only drawback was that I had to wait for the whey to form (from leaving out my raw milk). That could be 2-3 days. To get to the finished soda it could take 6-7 days all together.

 I moved on to water kefir. I purchased my grains from Lifetime Kefir. Now I can't keep up with drinking the soda. Every 2 days my grains produce a new batch of kefir water.  At that point I flavor and bottle it for 2 days for soda or mix it with tea for ice tea. So far my favorite soda flavorings have been lemon, ginger and vanilla. 

Be careful with kefir soda! I am scared to open it. My kids love to so I let them do that part. I've had a couple of real explosive bottles that I let ferment a bit too long.  A vapor so thick it looked like smoke came out and then VOLCANO eruption! We lost 1/2 the bottle on that one, it even blew the rubber gasket off the bottle. I advise always opening them the sink with a towel nearby.

Thursday, December 4, 2014

Dipping Salads

What makes fast food so easy to eat? It's available when you feel hungry. I often put together a "dipping salad" for those times when you might reach for a bag of chips or cookies. First off, I try not to buy chips and cookies often. I mostly do when I am having guests. For everyday I go with raw fruit and veg with a tasty dip. It's crunchy, it's colorful (big plus for me!), sweet  and salty. 

Dipping salads are so hands-on they sometimes do end up being played with. Sword fights with celery, making faces or other designs with the veg, and if you are small enough you can even wear it!

Yesterday we had this beautiful hot pink veggie. Do you know what it is?

Radish! Aren't these pretty? They are very sweet too. I have been eating these with slices of tart green apples, layering them together to make little sandwiches. I have mentioned this before, if you wash all your vegetables at one time to have them ready it will be much easier to eat them quickly. Remember, what makes it "fast" is that it is available immediately. With a bit of preparation you can have quick healthy snacks always at hand.

Friday, November 21, 2014

I made Paneer

I posted a video by Michael Pollan on FB this week about home cooking. I quoted him, "you can eat whatever you want as long as you cook it yourself". I was struck by his concept that if you cook at home you are less likely to eat fries everyday. With today's corporately cooked foods you can visit a drive thru and easily eat fries everyday. He goes deeper into the horrors of the industrial, pesticide potatoes that are used for those fries.

It got me thinking about this "eat anything you want" idea. I make donuts maybe 4-5 times a year. Same thing with cinnamon buns. My chocolate babka, once (for Easter). I love all these foods, they are amazingly tasty. They are even more special because they are connected to holidays or snowed in days with my family. These indulgences take time to make so they won't be made every day or even every week. Since I eat only my own versions of these things it keeps me from eating too much of them. 

People want their food quick. Fast foods are there for them and they are usually these carby, sugary fat foods. You want a quick sweet when you are out running errands? Carry bananas with you.  I take my chai or a pumpkin smoothy when running errands, I am never tempted to stop for a fast overpriced, overly sweetened beverage. Home cooking takes forethought and planning. It's not only cheaper and healthier, but it's tastier because you use quality ingredients and you tailor it to your liking.

The day after my FB post and comments on the subject of homemade food I found myself in front of the frozen food at my local healthy grocery store. I saw a pre-made frozen Indian paneer dish and I wanted it. Right away my own words came back to haunt me...."make it yourself". Practice what you preach, right? Paneer was a always mystery to me, exotic and delicious. I purposed to give it a shot.

I went home and found a recipe, it seemed too easy. Just three ingredients. I enlisted my youngest to help and we went at it. First I heated a 1/2 gallon of whole milk just until it started to boil. Then we streamed in 1/4 cup of water mixed with 1/4 cup of fresh lime juice. The curds immediately started to form, we stirred and then took it off the stove to let it sit for five minutes. We then poured it through a sieve (lined with a kitchen towel) over a large pyrex measuring cup.

All the whey that was collected. 

I wrapped it tightly in the towel, rinsed it under cold water and then put in back in the sieve to drain with a weight on top. I did this in the morning, by the time I was ready to cook dinner it was dry. I cut it into cubes and sauteed them in a mix of oil and butter. Once browned I removed from the pan while I made a sauce of jar tomatoes, ginger, garlic, lots of Indian spices and peas. It was better that the frozen counterpart and there was much more of it for the money. I ate 1/2 of it straight from the saute pan wrapped in hot sourdough naan. It was a perfect combination because at the same the cheese was drying out all day the nann dough was fermenting. The finished product is pretty fancy, but honestly the prep was not too time intensive. This was actually made on our busiest day out this week. I hope you will watch Michael Pollan's extremely informative video and even more I hope you will take the challenge to to make something that you usually buy in it's factory cooked form. Let me know how it goes.

The only other cheese I have ever attempted was goat yogurt cheese, which was even simpler that this paneer, check it out here: Hanging the Cheese

Wednesday, November 12, 2014

Green Morning

You have to use your veggies while they are ripe and fresh. Herbs and avocados are especially prone to deteriorating. It's miserable to let that window of opportunity slip by and have to dispose of good food. This morning my cilantro, basil, kale and avocados where ready to go. The rest of my week will be busy. I figured I might as well go ahead and make them into things that will keep that I can use later on. 

I made some kale chips, guacamole, pesto and a cilantro lime salad dressing. It made a big mess, but it was one big mess to clean and I was done. Instead of many small messes over a couple of days. 

We had the kale chips for breakfast as soon as they were done. The girls had theirs with sourdough rolls and fried garlic. I had them with a mushroom omelette and continued munching on them throughout the day.

For lunch I had the cilantro dressing on salad and some of the guacamole on a raw seed cracker. There is plenty leftover for whatever meals or snacks come next. The point here is to make a few things all at once. Since you're making a mess you might as well go for it and then you can reap the rewards for days to come.

Monday, August 25, 2014

watching the celery grow

We are coming down from a week of busy- busy- busy. It feels so good to just stay home and *watch the celery grow. 

By coincidence (more like divine synchronicity) two of our friends, Rin and Holly  happened to be visiting us here in NY from Cambodia during the same week.  They both work with an organization called Water of Life. That's how we met them. Water of Life is a church and an orphanage in Pnom Phen. A couple of years ago my church began visiting and helping to support Water of Life. Through our close contact visiting and working together on various projects these folks have been knit into our family.

 Rin had never been to NY before so of course we wanted to show him a good time. Central Park, The Metropolitan Museum of Art, the B'way production of Les Miserables were some of the things crammed into our week together. On top of that we had to show them the natural beauty of NY State. So we climbed a mountain...and had to climb back down. Whew!

Add to these activities VBS (Vacation Bible School) every day. My daughter signed up weeks ago to work at VBS, so we couldn't very well back out now. Our crazy week finished up with my big girl's 15th birthday. By then neither of us wanted or needed to plan a celebration. The whole week was a party! A friend suggested that a bunch of us gals could meet at our favorite tea room for a no stress/ no work birthday tea, so that's what we did. 

It was a wonderful and memorable week, but I'm really happy that I have no plans or obligations this week. The only deadline I have is to make a dress for my young one to wear to the Ren Faire this weekend. Ahhh. 

* The celery thing is fun to do with kids and you get some bonus food. It's a kind of recycling. My young one likes to measure and document the growth. Just take those cut base ends of celery stalks and put them in water. They will not only grow roots, but they will grow more celery. They won't get as big and as thick as they once were but they will grow. 

Monday, May 19, 2014

Bag Refashion: cute fabric is the cure

I've been using this lunch bag for over a year. It comes with me every time I leave the house. It totes water, tea, books, snacks and whatever else the day calls for. It usually comes back with more than we left with: sticks, rocks, flowers, leaves...bugs. For some unexplainable reason whichever bottle I use inevitably leaks tea all over the bottom of the bag. It has been washed and dried so many times but the tea stains remain. 
After the latest washing I noticed not only is it still stained, but it's looking quite ragged and faded from the multiple drying sessions. Lately I found myself Looking at and examining lunch bags when shopping. I feel guilty, I have a perfectly good bag...sure maybe it's ugly but it is completely functional. I secretly wished the dryer had torn it up a bit to justify a purchase. "I'll dye it!", I thought.  One of my tried and true ways to quench my urge for the new is to dye.

I wanted red, I dyed it red. It didn't come out red. It came out a pink that actually looks much better in this photo than it did in real life. I didn't like it, Mama Doll didn't like it. I was so close to buying a new bag. The doll gave me the answer!

She was sitting on my work table next to the bag and it hit me. "I have a bit left of that matryoshka fabric, hmm let's see if there is enough". I made a slip cover of sorts. I had just enough fabric with nesting dolls (and adorable animals) for the front.

There was enough of the small print to cover the rest.
It's so cute!

The new fabric is quite soft, it would not hold up to the wear and tear that the bottom will take. So I left the bottom as is, a nice tough black canvas. Mama Doll agrees, this fabric was the right choice.